The Arduino UNO Q isn’t your regular Uno board. It’s a hybrid powerhouse that combines a Linux processor and a real-time microcontroller on a single board — giving you the flexibility of high-level computing and the precision of low-level control in one place.
At its core, UNO Q features the Qualcomm Dragonwing QRB2210 MPU running Debian Linux, paired with the STMicroelectronics STM32U585 MCU running Arduino Core on Zephyr OS. Both chips communicate through Arduino’s Bridge (RPC), which means your Arduino sketches can tap into Linux services, and your Linux apps can control hardware in real time.
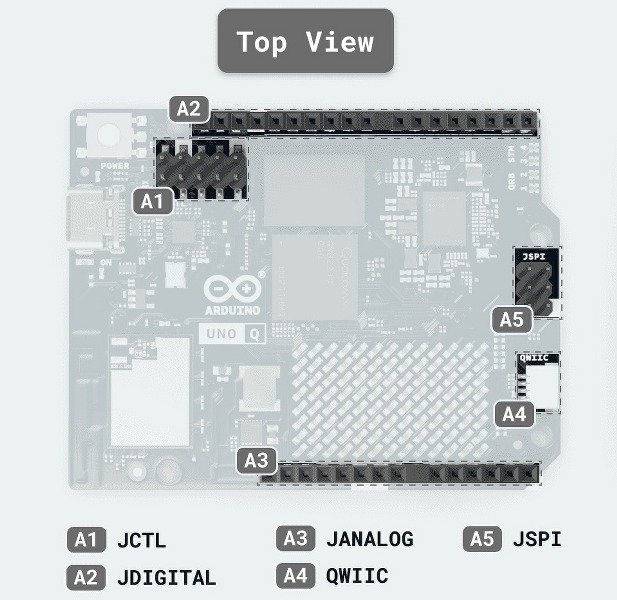
But what really unlocks this board’s potential is its pinout. The UNO Q offers familiar Arduino-style headers on the top for quick prototyping with shields and modules — plus high-speed connectors at the bottom for cameras, audio, and other advanced peripherals. Whether you’re wiring up a simple sensor or building a vision-based robotic arm, these pins are what bring your projects to life.
This guide walks you through the UNO Q pinout step by step — what each header does, how it’s different from the classic Uno, and how you can use it effectively in your projects.
Table of Contents
Arduino UNO Q Pinout Overview
*Source: Read the detailed documentation here.
Unlike older Uno boards, the UNO Q gives you two layers of connectivity:
- Top headers – classic Arduino-style pins for quick prototyping
- Bottom connectors – high-speed expansion for advanced modules like cameras and audio.
This means you can plug in shields and modules like a regular Uno or build more complex systems like AI vision projects and smart devices.
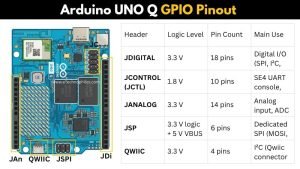
Top Headers (Main I/O)
| Header | Logic Level | Pin Count | Main Use |
|---|---|---|---|
| JDIGITAL | 3.3 V | 18 pins | Digital I/O: SPI, I²C, UART, PWM, CAN |
| JANALOG | 3.3 V | 14 pins | Analog I/O and ADC channels |
| JSPI | 3.3 V logic + 5 V VBUS | 6 pins | Dedicated SPI interface |
| QWIIC | 3.3 V | 4 pins | I²C (Qwiic ecosystem) |
| JCTL | 1.8 V | 10 pins | UART console and control signals |
These are the pins most makers will use. They work just like a standard Arduino header — but at 3.3 V logic (instead of 5 V on older Unos). So make sure your external modules are 3.3 V compatible or use a level shifter.
JDIGITAL – Digital I/O
- 18 pins at 3.3 V
- Supports SPI, I²C, UART, PWM, and CAN functions
JANALOG – Analog I/O
- 14 pins at 3.3 V
- ADC channels and reference pins for analog sensors
JSPI – SPI Header
- Dedicated SPI lines (MOSI, MISO, SCLK)
- 5 V VBUS + GND + MCU reset (NRST)
QWIIC – Qwiic Connector
- 4-pin I²C interface (3.3 V)
Lets you easily plug in Qwiic-compatible sensors and modules without soldering. Perfect for quick prototyping.
JCTL – Control Header
- 1.8 V logic, 10 pins
- SE4 UART console
- Forced USB boot input
- PMIC reset input
Mostly used for debugging or advanced control setups.
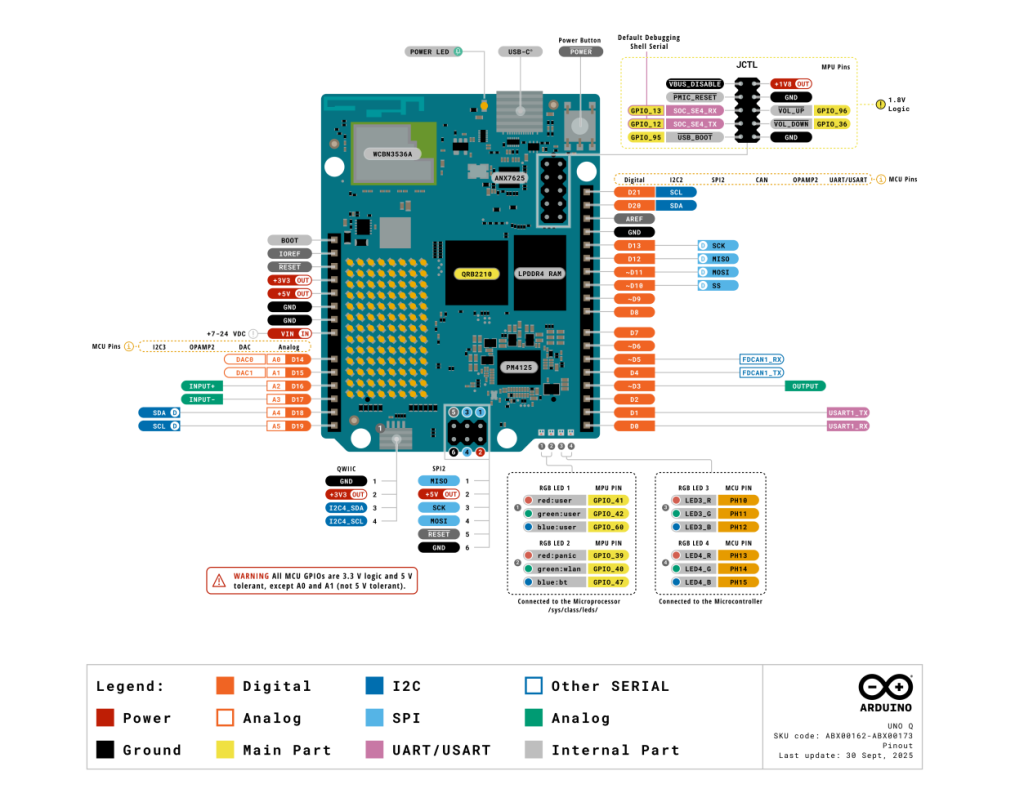
Bottom Connectors (advanced expansion)
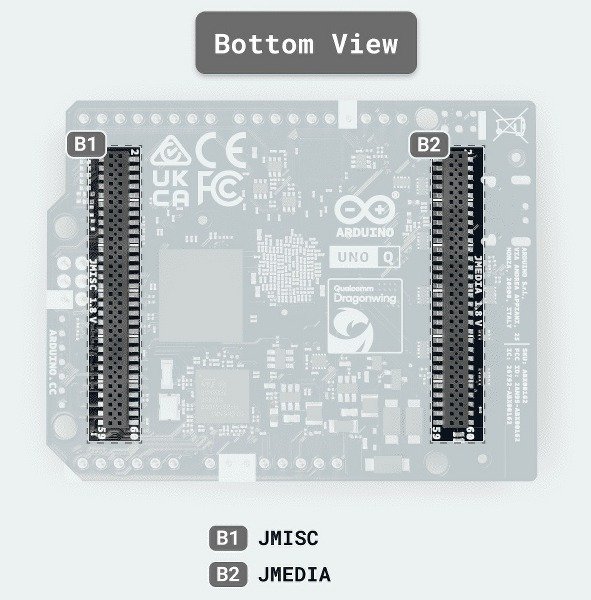
| Header | Voltage | Pin Count | Main Use |
|---|---|---|---|
| JMEDIA | Mix | 60 pins | High-speed camera & display interfaces (MIPI CSI/DSI) |
| JMISC | Mix | 60 pins | Mixed GPIO, SDIO, audio, advanced peripherals |
JMEDIA – Media header
- MIPI CSI and DSI lanes for camera and display
- Camera control bus (CCI I²C)
- Camera clock support
- Carries +3.3 V OUT, VIN IN, and GND
JMISC – Miscellaneous expansion
- Mixed GPIO and SDIO
- MCU peripherals like SDMMC1, TRACE, PSSI, I²C4
- Audio endpoints (Mic in, headphone out, line out, earpiece, etc.)
- MPU GPIO banks at 1.8 V
- Power rails included
Note: MCU pins at 3.3 V logic. MPU pins at 1.8 V logic.
UNO Q power requirements
Powering the Arduino UNO Q is a bit different from classic Uno boards. It supports multiple input options and includes an advanced power management system that distributes voltage across its Linux processor, microcontroller, and peripherals.
How to power the board?
You can power the board in three main ways:
- USB-C port
- The easiest way to power the UNO Q.
- It supports USB Power Delivery and requests 5 V at 3 A (it won’t use higher voltages).
- Use a good-quality USB-C cable and a 5 V 3 A adapter so the board stays stable even during heavy loads like Wi-Fi or display startup.
- DC input (VIN)
- You can also power it through the 7 – 24 V DC barrel jack.
- The board automatically steps this down to 5 V for the system.
- This option is great if you’re running motors or other high-power parts.
- 5 V pin on the JANALOG header
- If you already have a regulated 5 V source, you can feed it directly into the board using this pin.
Pin voltage level
Now, let’s look at the voltage level of different pins on UNO Q:
- Digital pins:
All digital GPIO pins work at 3.3 V logic.
That means:- HIGH = 3.3 V
- LOW = 0 V
Don’t connect them directly to 5 V sensors or modules — you could damage the board.
If you need to use a 5 V device, use a logic level shifter.
- Analog pins:
The analog pins also work at 3.3 V max.
Any voltage above 3.3 V on these pins can harm the MCU’s ADC input. - 5 V pin:
This pin gives you 5 V output power (from USB or DC input).
You can use it to power other modules — but don’t feed 5 V back into GPIO or analog pins. - 3.3 V pin:
A regulated 3.3 V output — safe for powering low-voltage sensors. - VIN pin:
For external power (7 – 24 V). It’s a power input only, not a logic signal. - 1.8 V pins (control lines):
These are for internal communication and special functions.
Avoid connecting anything external here unless you know exactly what you’re doing.
FAQ
Can I still program UNO Q using the Arduino IDE?
Absolutely. You can write and upload Arduino sketches to the STM32U585 MCU just like any other board.
You can also access the Linux side for running higher-level applications, AI models, or scripts — all through the Arduino App Lab.
What voltage do the GPIO pins use?
The GPIO pins operate at 3.3 V logic.
Can I run Linux and Arduino sketches at the same time?
Yes. UNO Q’s dual-processor architecture allows both systems to run simultaneously.
The Bridge (RPC) library lets them talk to each other — so Linux apps can control GPIOs or read sensors through the MCU side.
Is the Arduino UNO Q compatible with older Arduino shields?
Yes. UNO Q keeps the same header layout as the classic Uno, so most shields will fit physically.
However, since UNO Q uses 3.3 V logic instead of 5 V, you should double-check voltage compatibility before connecting older shields.