Last updated on March 23rd, 2024 at 11:45 am
I am sure you must be familiar with an AND Gate, its truth table, logic symbol, and its working. But do you know how to build your own And Gate on Breadboard? If not then don’t worry, we have got you covered. In this post, you will learn how to make an AND Gate using diodes on a breadboard.
Table of Contents
What is an AND gate?
AND gate is a simple three-terminal Logic Gate. It is called AND gate because AND means “to multiply”. There are two inputs and one output in this Gate. When both the inputs are HIGH, the output is HIGH. In comparison, the output is LOW or Zero in all the other cases.
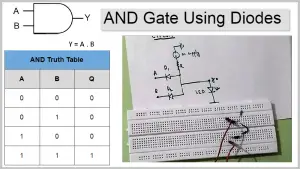
AND gate symbol & truth table


You can also watch the video below for quick reference:
Components required
To make this on a breadboard, you need the following components:
- 1N4007 Diode X 2
- 1k Resistor
- LED
- 9 Volt Battery
- Connecting Wires
- Breadboard
If you are a beginner and want to know about breadboards in detail, read: How to Use a Breadboard in 5 Easy Steps
Circuit diagram

This is the circuit we are going to build on a breadboard.
Making AND gate on a breadboard step-by-step
Step 1: Place the two diodes as shown below. The N-terminal is the silver portion, P-terminal is the black portion.

Step 2: Connect two jumper wires at the N-terminal of each diode. The input logic to the gate is given through these wires. Call them A and B.
Step 3: Connect the P terminal of each diode.
Step 4: Connect the battery’s +ve and -ve terminals to the breadboard as shown below.
Step 5: Connect an LED from the P-terminals to the Gnd(battery’s -ve terminal).

Working
NOTE: When the P-terminal of a diode is at a higher potential (>.7v) than its n-terminal, the diode acts as a short circuit. When the n terminal is at a higher potential, the diode acts as an open circuit.
CASE 1: Input A=0, Input B= 0, Output=0 (LED is OFF)


In this case, the p-terminal of both diodes is at a higher potential than the n-terminal and hence acts as a short circuit. Thus all current flows from the battery through a 1k resistor, then diode to the Ground. Hence there is no voltage across the LED and it remains off i.e., 0 at the output.
CASE 2: Input A=0, Input B= 1, Output=0 (LED is OFF)


In this case, the p-terminal of diode A is at a higher potential than the n-terminal. Hence the diode A acts as a short circuit. Thus all current flows from the battery through a 1k resistor, then diode A to the Ground. So there is no voltage across the LED and it remains off i.e. 0 at the output.
CASE 3: Input A=1, Input B= 0, Output=0 (LED is OFF)

In this case, the p-terminal of diode B is at a higher potential than its n-terminal and hence acts as a short circuit. Thus all current flows from the battery through a 1k resistor, then diode B to the Ground. Hence there is no voltage across the LED and it remains off i.e., 0 at the output.
CASE 4: Input A=1, Input B= 1, Output=1 (LED is ON)


In this case, the p-terminal of both diodes is at a lower potential than the n-terminal. Hence both act as an open circuit. Thus, current flows from the battery through the 1k resistor to the Ground. Lighting up the LED on its way. So there is some voltage across the LED and it is turned ON i.e., 1 at the output.
** Hence we get 1(LED is on) at the output only when both inputs are 1, as in the truth table.